Homemade Cold Veggie Pizza - Sally's Baking Addiction
This homemade veggie pizza is served cold, and comes with a garlic and herb Greek yogurt cream cheese topping, and a garden-full of fresh vegetables. (Use your favorites!) Arrange it all on a buttery flatbread-style crust, and serve it as a fabulously tasty and colorful appetizer at your next potluck or party. It’s a crowd favorite!
One reader, Jennie, commented: “My family has made this base recipe for years, but with a crescent roll crust and ranch packet to season the cream cheese. I have to say, the homemade touches—from the crust to the seasonings in the cream cheese—really take it to the next level! This made a great light summer weekend lunch! ★★★★★“

We’re all familiar with cold pizza, perhaps leftovers lingering in the fridge from the night before. But have you ever made pizza that’s… meant to be cold? Kind of like a cold tomato pie, but with garlic herb cream cheese and loads of fresh vegetables on top.
I usually see cold veggie pizza as an appetizer at potlucks, events, and parties, and it’s almost always sitting on a crescent roll crust. The kind from a tube, which, honestly, is just so convenient and quick.
But I wanted to try my hand at a homemade version, on a buttery garlic flatbread-type crust. Turns out, with a couple small tweaks to my flatbread pizza dough, we have the perfect not-out-of-a-tube base for this delightful party favorite!

The Veggie Pizza of Your Dreams Is:
(Wait, you don’t dream about vegetable pizza?)
- Completely homemade, and pretty healthy as far as pizza goes!
- Served cold, and always loved.
- Altogether garlicky, savory, creamy, crisp, and herb-infused.
- Ready for your favorite fresh vegetables.
- Calling your name!
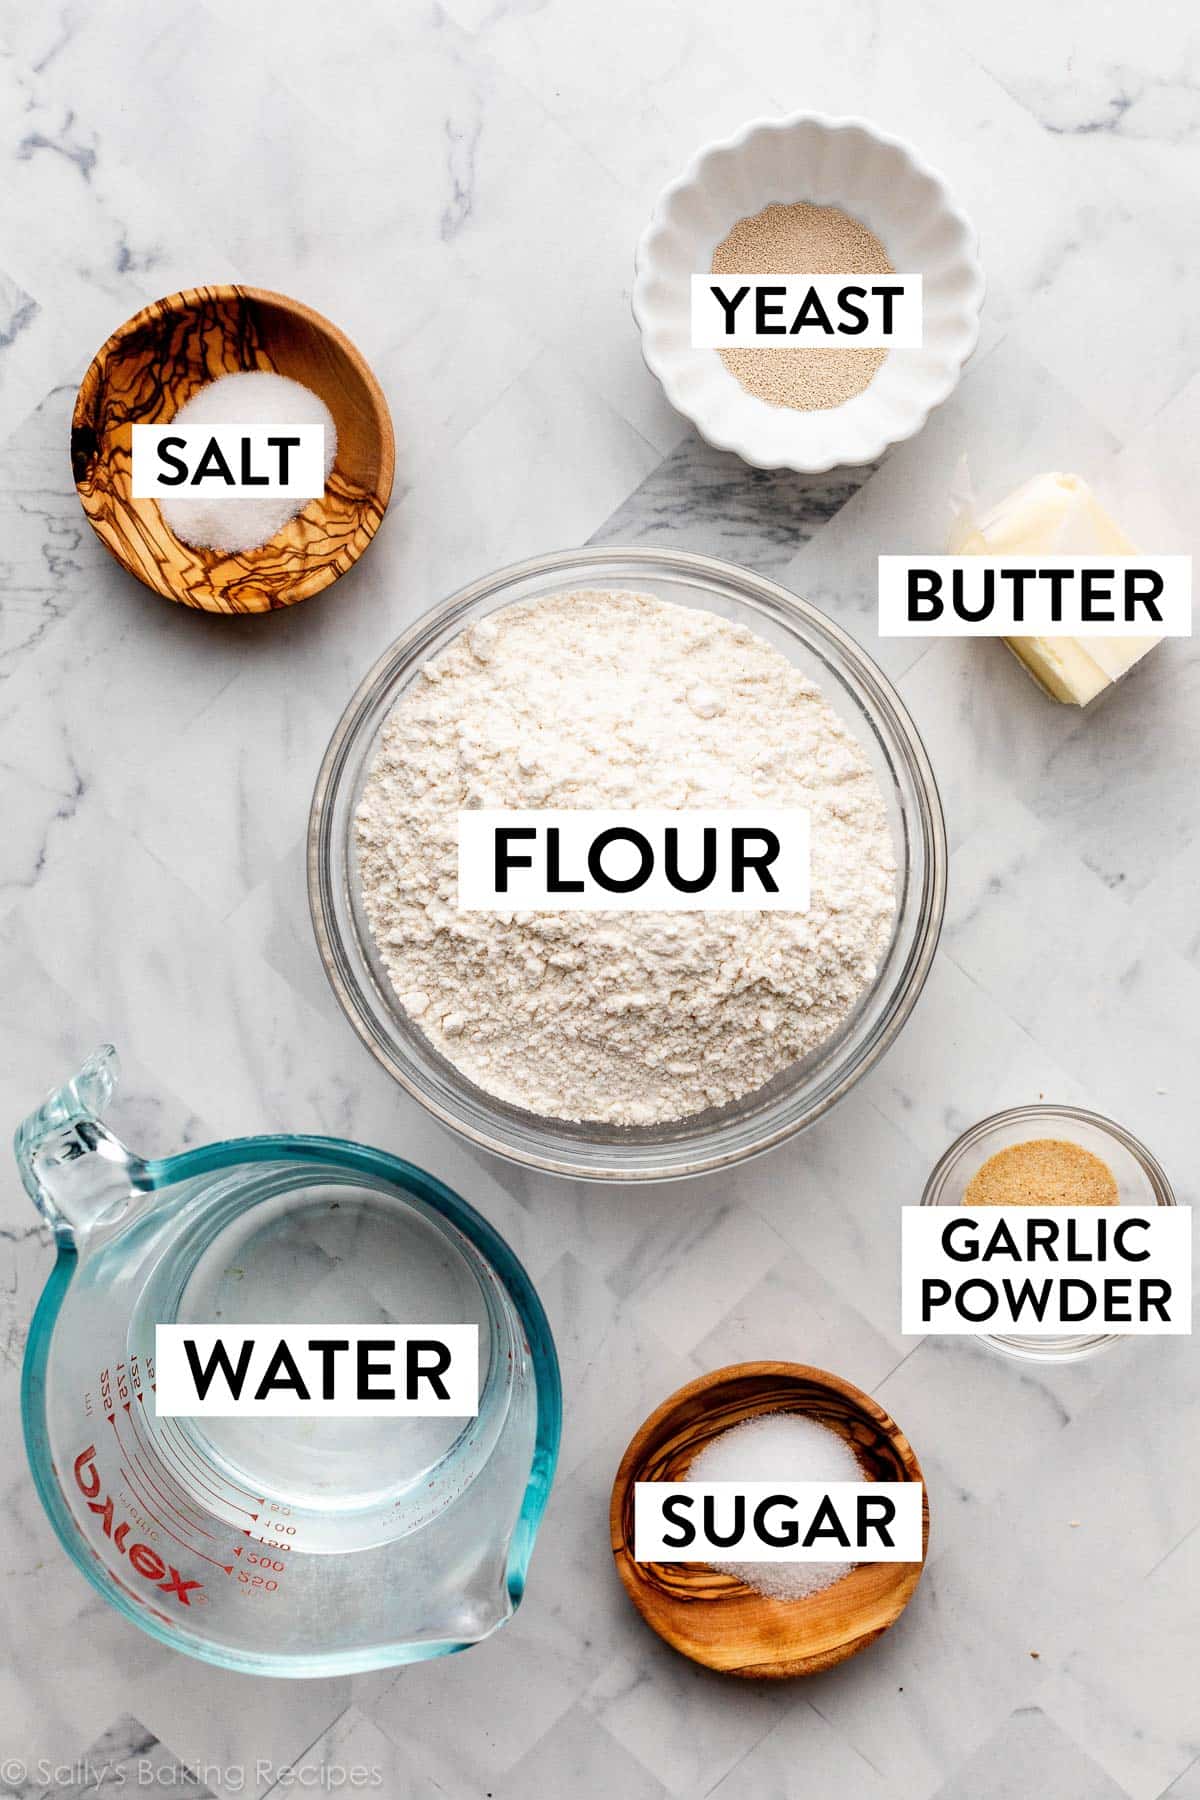
What You Need for the 1-Hour Dough:
If you’ve made my homemade flatbread pizza before, you’ll be very familiar with today’s dough. Instead of olive oil, I use melted butter to add some rich, buttery goodness. You’ll also need yeast, sugar to feed the yeast, water, garlic powder, salt, and bread flour. If you don’t have bread flour, just use regular all-purpose flour.
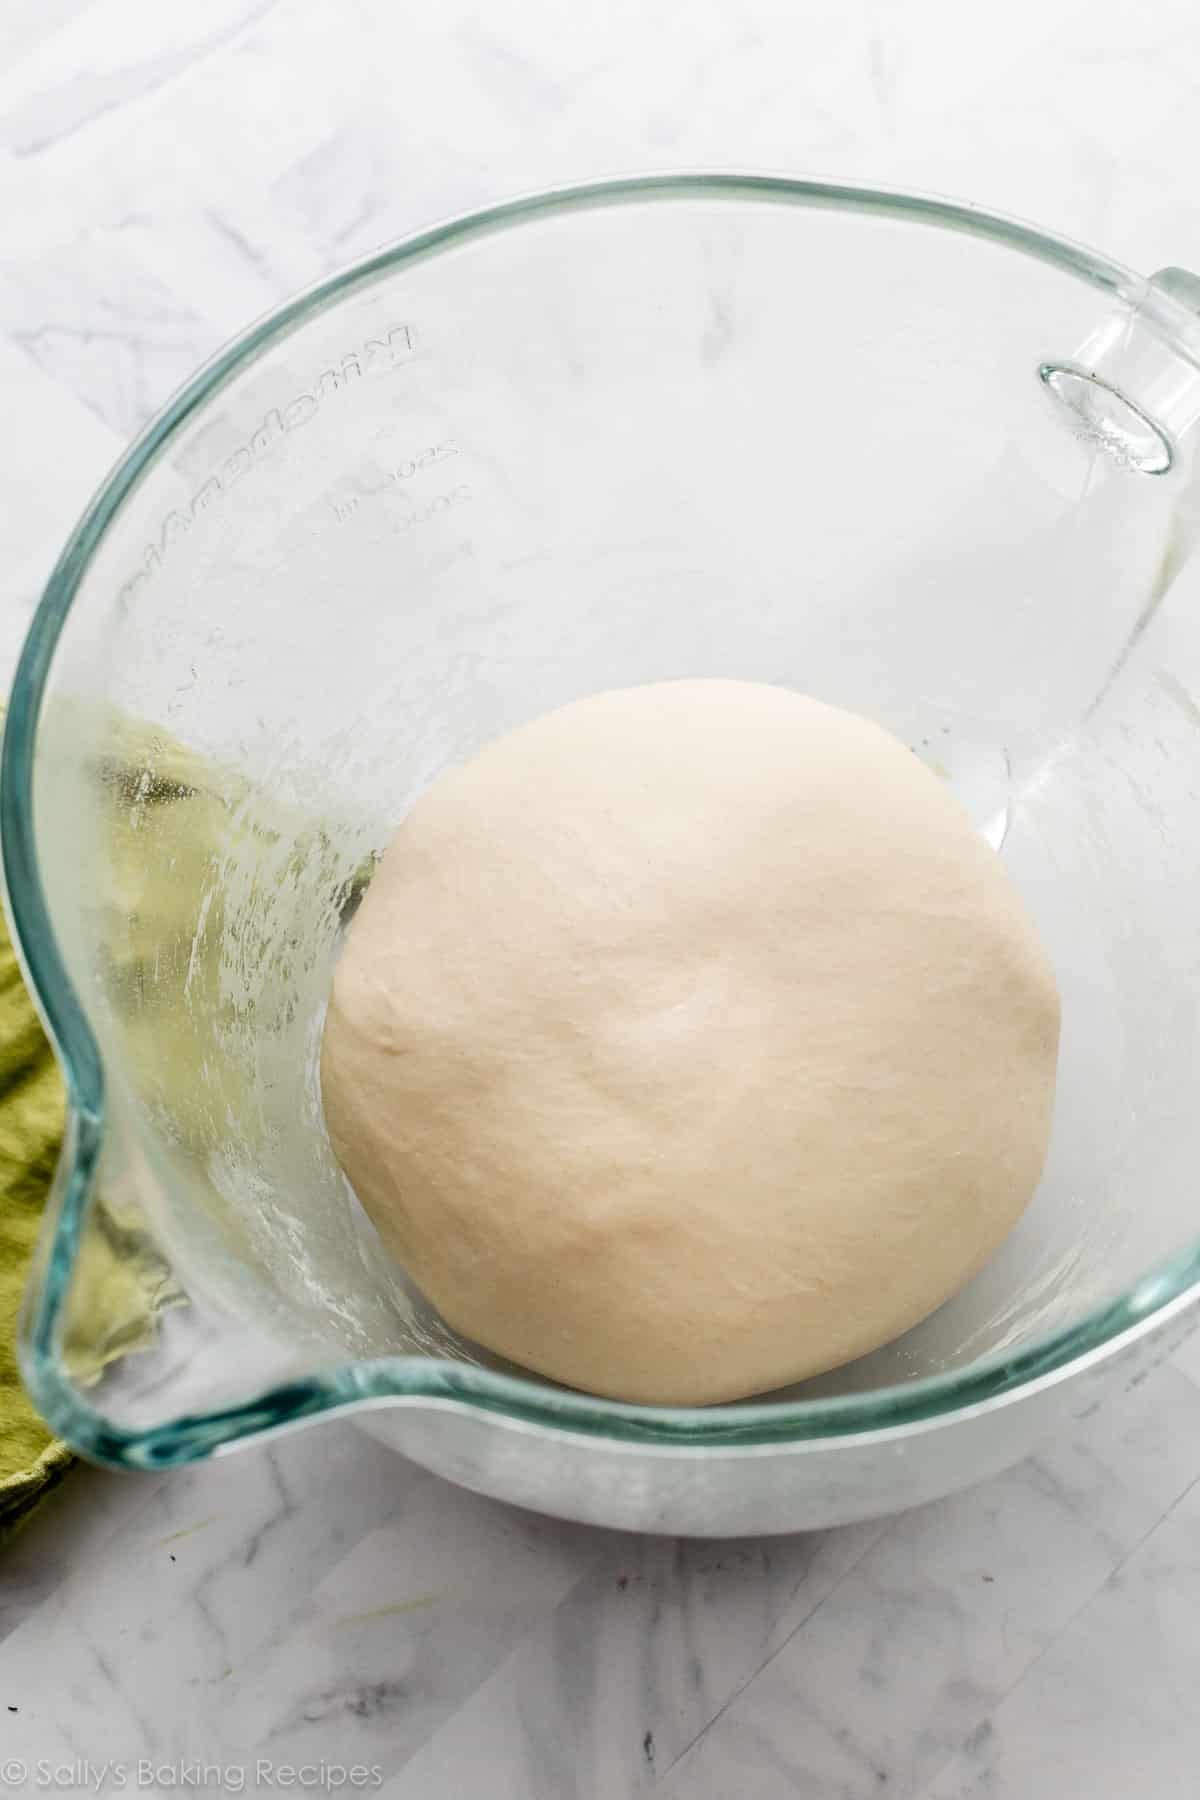
I know it’s much easier to use store-bought dough, but nothing compares to a homemade crust! Trust me, have a go at making this dough yourself. It’s quicker than pizza dough, and you’ll be pleasantly surprised with how easily it comes together. There’s only 1 quick 1-hour rise.
The dough doesn’t need much time to rise, because you want it to stay pretty flat. After the brief rise, punch it down to release any air, and then roll it out into a 10×15-inch rectangle.
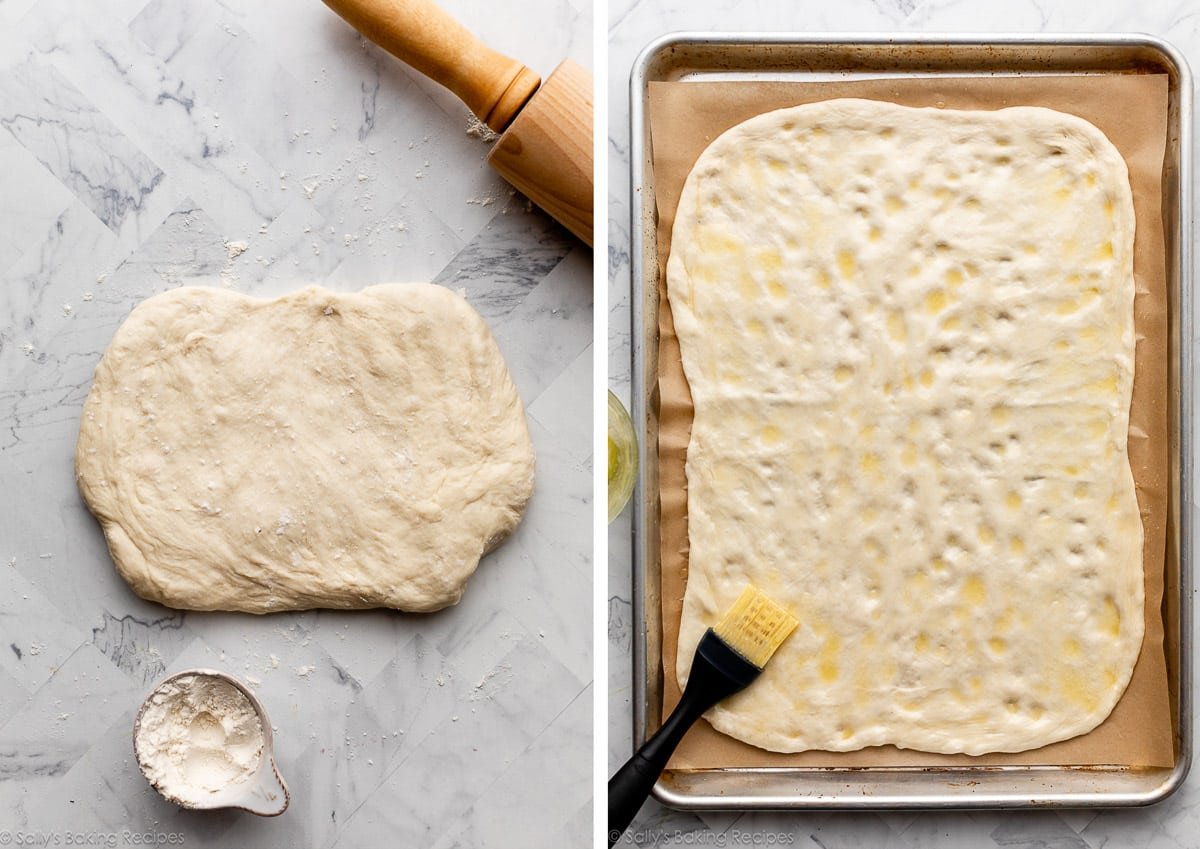
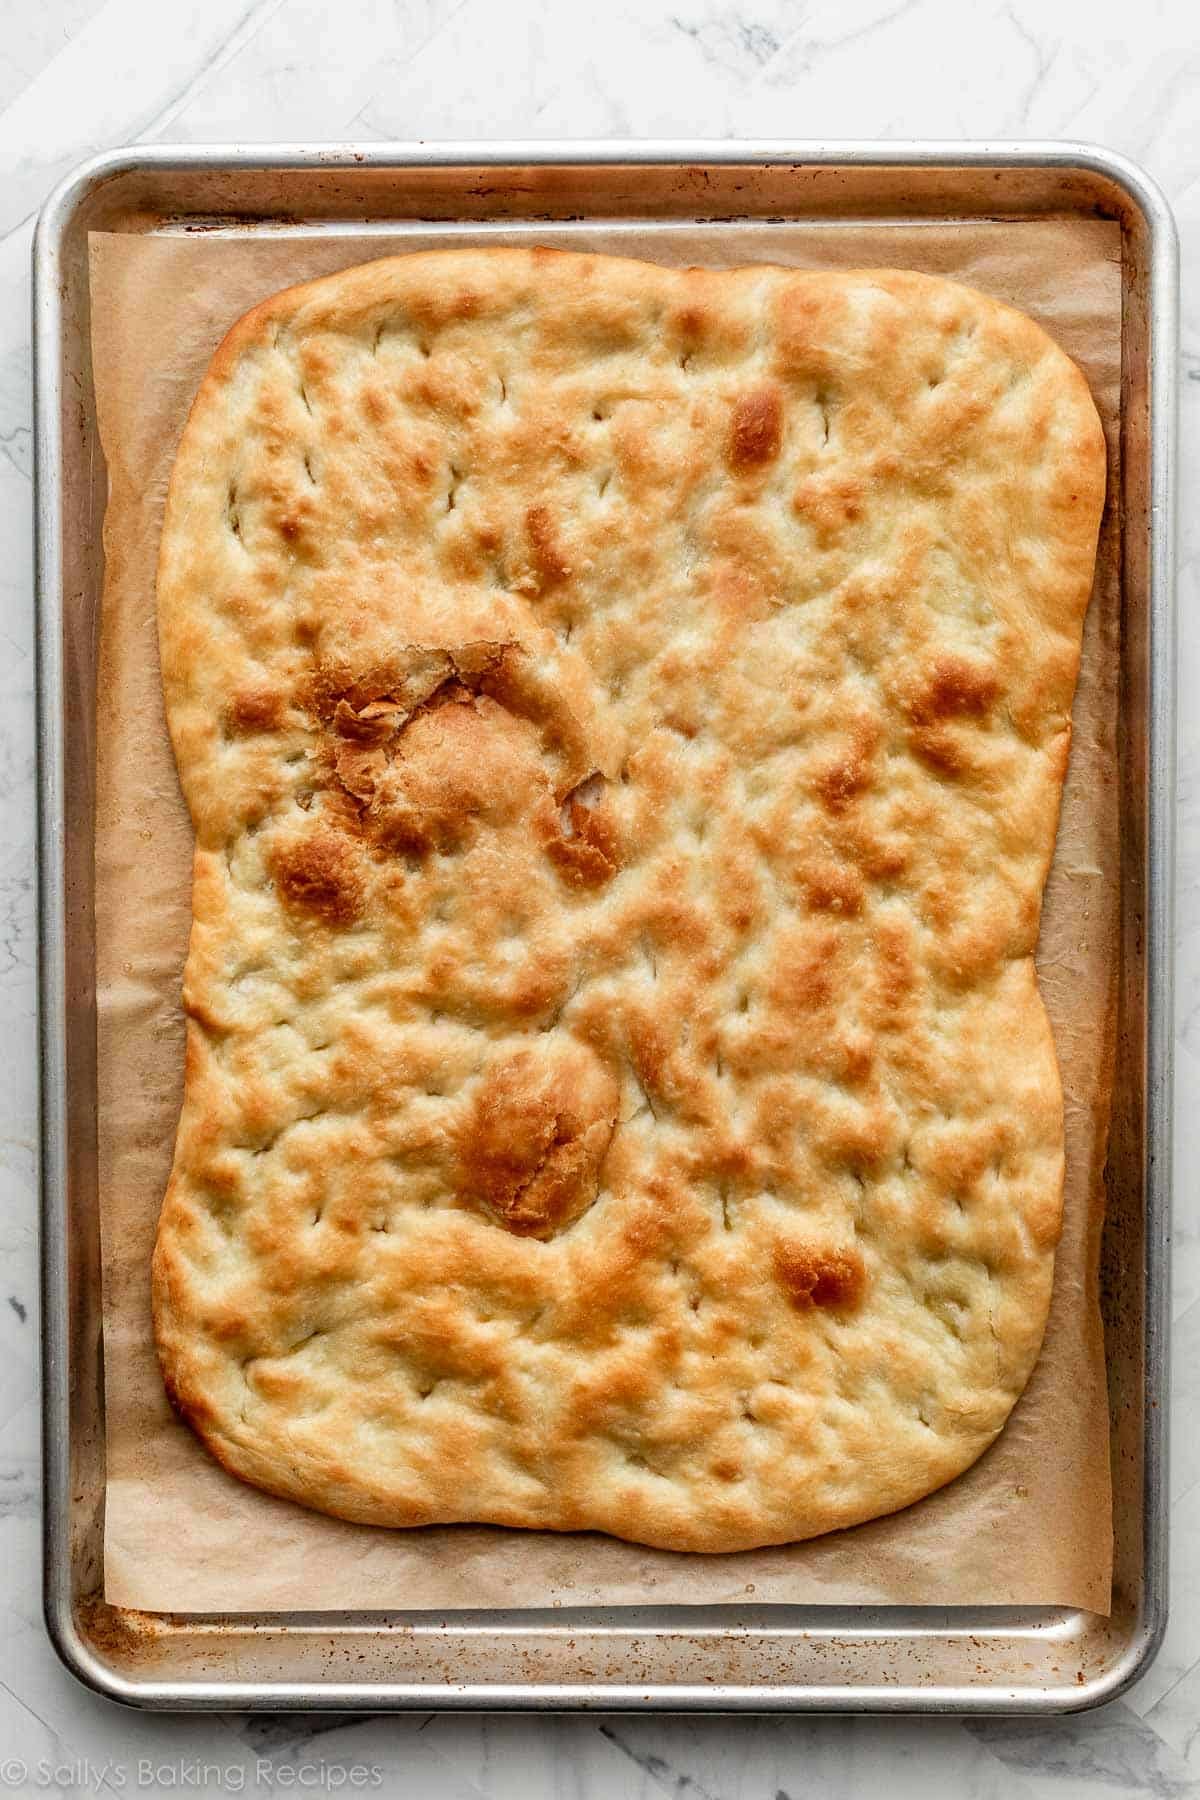
Dimple the dough all over the surface with your fingers, like we do when making focaccia. Then, brush it with melted butter (the dimples hold on to the butter!). Bake it for 17–20 minutes. As it cools, prep the toppings.
Ingredients for the Veggie Pizza Topping
You’re making a savory cream cheese and Greek yogurt topping here, and I love to use everyday seasonings like garlic and onion powders. Fresh dill pairs beautifully with cream cheese, and feel free to also add some chopped fresh parsley or basil. Spread it on top of the crust.
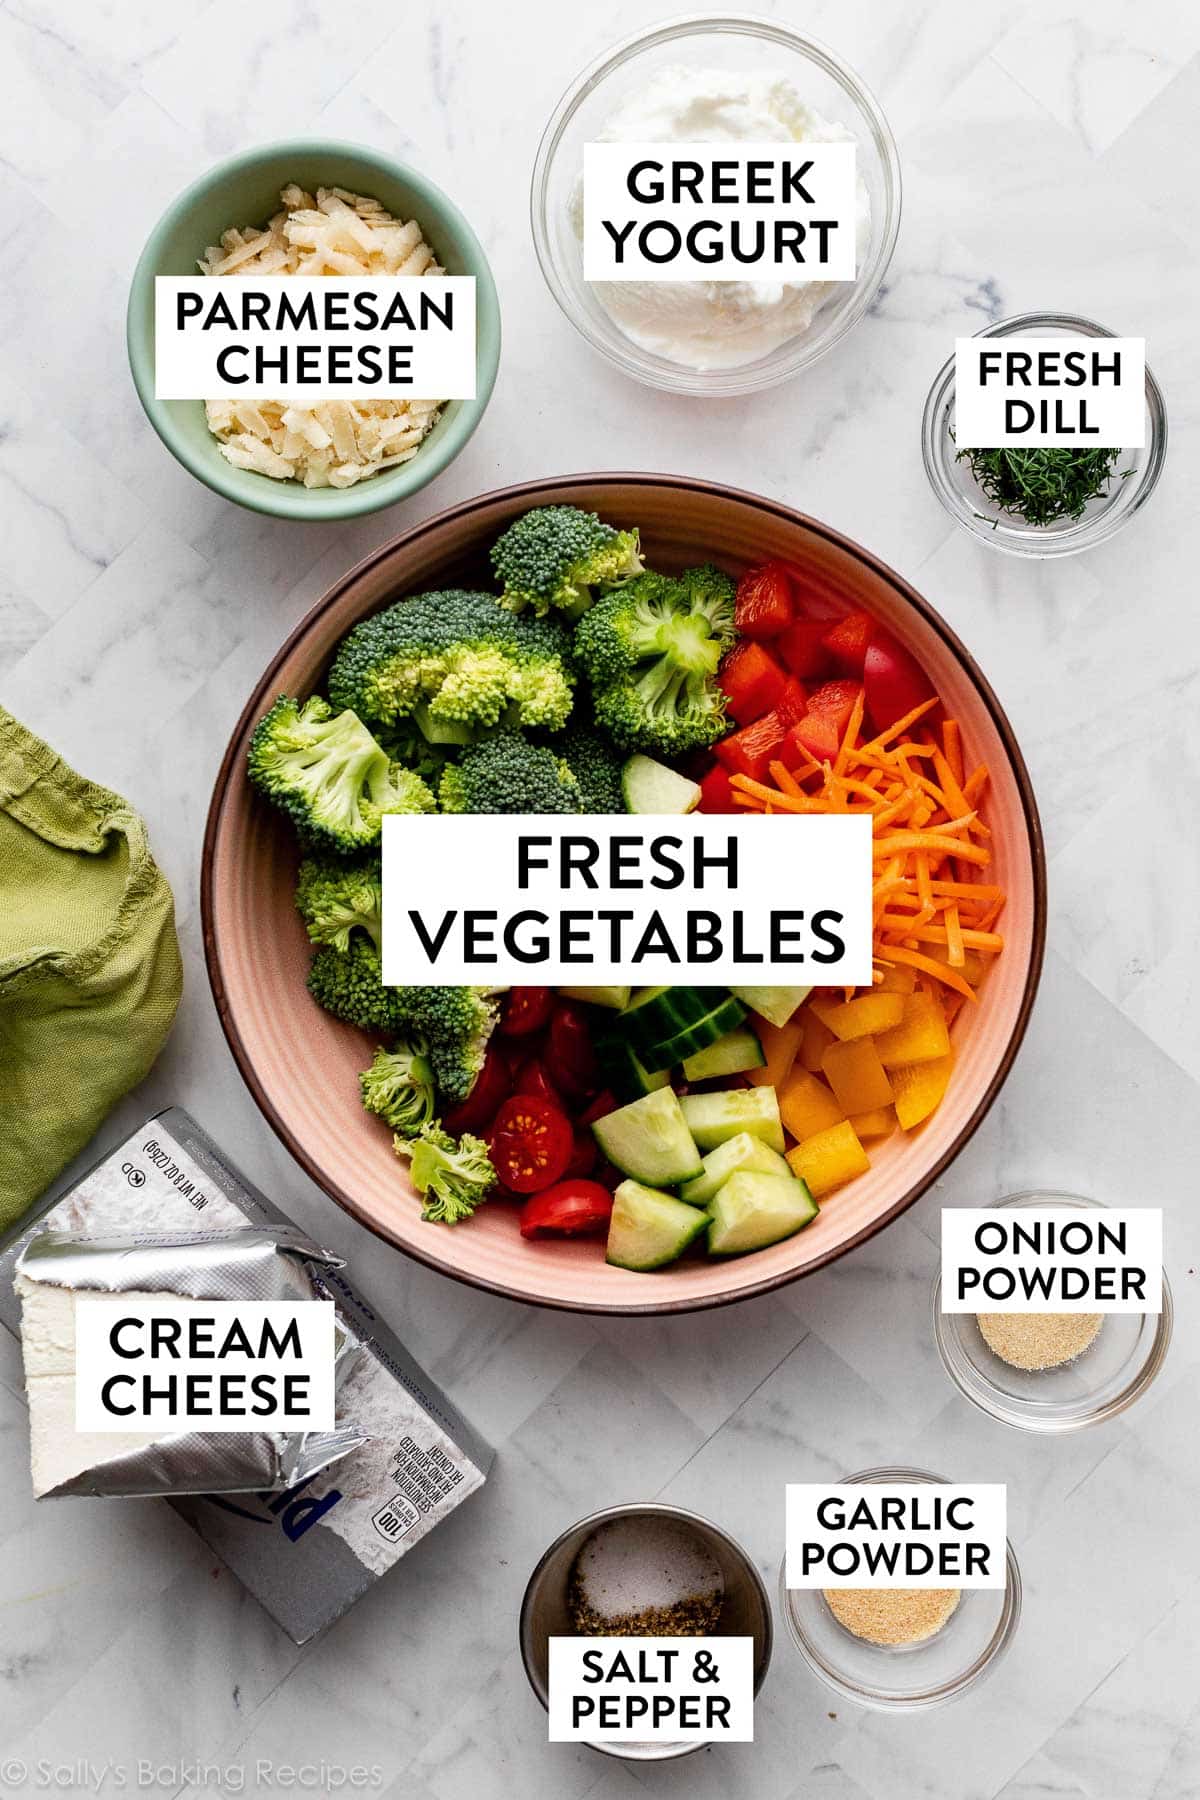
Best Vegetables to Use:
Keep the amount to 3–4 cups, about the same amount of fruit you would use for a fruit pizza. Crowd favorites include:
- Chopped broccoli
- Colorful bell peppers
- Cucumbers
- Cherry tomatoes
- Shredded carrots
- You can also use cauliflower, sliced olives, and/or radishes.
Sprinkle with parmesan cheese, chopped scallion, and some freshly ground black pepper. Dig in!

If you’re bringing this to a summer gathering, you may also want to think about dessert. (Of course you want to think about dessert!) Here are 25+ tasty desserts for a BBQ cookout. 🙂

Cold Veggie Pizza (Homemade Appetizer)
Prep Time: 1 hour, 20 minutes
Cook Time: 18 minutes
Total Time: 2 hours, 10 minutes (includes cooling)
Yield: 16–20 slices
Category: Dinner
Method: Baking
Cuisine: American
Description
This veggie pizza combines a homemade flatbread-style crust, garlic and herb Greek yogurt cream cheese topping, and plenty of crisp and fresh vegetables on top. It’s a crowd favorite, and you can use whatever veggies you love. Make-ahead-friendly!
Dough
Cream Cheese Topping
Vegetables & Garnish
Instructions
- Prepare the dough: Whisk the yeast, sugar, and warm water together in the bowl of your stand mixer. Loosely cover and allow to sit for 5–10 minutes until foamy and frothy on top. *If you do not own a stand mixer, you can do this in a large mixing bowl and, in the next step, mix the dough together with a large wooden spoon/silicone spatula. It will take a bit of arm muscle. A hand mixer works, but the sticky dough repeatedly gets stuck in the beaters. Mixing by hand with a wooden spoon or silicone spatula is a better choice.*
- Add the flour, 2 Tablespoons (28g) melted butter, garlic powder, and salt. Mix on low speed with the dough hook attachment until combined, about 2 minutes. The dough should be thick, yet soft and slightly sticky. It should pull away from the sides of the bowl as it mixes. When it does, it is ready to knead. If, however, the dough is too sticky to handle, mix in more flour, 1 Tablespoon at a time. Make sure you do not add too much extra flour; you want a soft, slightly tacky dough.
- Knead the dough: Keep the dough in the mixer and beat for an additional 6-8 full minutes, or knead by hand on a lightly floured surface for 6-8 full minutes. (If you’re new to bread-baking, my How to Knead Dough video tutorial can help here.) If the dough becomes too sticky during the kneading process, sprinkle 1 teaspoon of flour at a time on the dough or on the work surface/in the bowl to make a soft, slightly tacky dough. Do not add more flour than you need because you do not want a dry dough. After kneading, the dough should still feel a little soft. Poke it with your finger—if it slowly bounces back, your dough is ready to rise. You can also do a “windowpane test” to see if your dough has been kneaded long enough: tear off a small (roughly golfball-size) piece of dough and gently stretch it out until it’s thin enough for light to pass through it. Hold it up to a window or light. Does light pass through the stretched dough without the dough tearing first? If so, your dough has been kneaded long enough and is ready to rise. If not, keep kneading until it passes the windowpane test.
- Place the dough in a greased bowl (I use nonstick spray) and cover with plastic wrap, aluminum foil, or a clean kitchen towel. Allow to sit and rest for 1 hour at room temperature. Once it has rested and slightly risen, you can continue with the recipe or place the covered dough in the refrigerator for up to 2 days. More instructions in the make-ahead Note below.
- Preheat oven to 450°F (232°C).
- Shape the dough: Punch the dough down to release any air. On a lightly floured surface with a lightly floured rolling pin, roll the dough into a 10×15-inch rectangle (doesn’t have to be exact), about 1/4-inch thick. Don’t worry if it’s not a perfect rectangle, just make sure the dough is very thin. Carefully transfer dough to a parchment paper- or silicone mat-lined baking sheet. (You can also shape/roll out the dough directly on a silicone baking mat or a large sheet of parchment and then just transfer the whole thing to the baking sheet.)
- Poke your fingers all over the surface of the dough to create dimples. Brush with remaining butter.
- Bake for 17–20 minutes or until the crust is golden brown. It may have air bubbles—that’s ok. Remove from oven, and allow crust to cool completely or for at least 30 minutes as you prepare the toppings. As the crust cools, use the back of a spoon to press down on any large air bubbles to help flatten out the crust. As the crust cools, chop the fresh vegetables for the topping.
- Make the cream cheese topping: In a medium bowl using a handheld or stand mixer fitted with a paddle or whisk attachment, beat the cream cheese and yogurt together until smooth. Beat in the dill, garlic powder, onion powder, salt, and pepper. Taste, and then add more seasonings if desired. Spread onto cooled crust.
- Vegetables & garnish: Lightly press the chopped vegetables into the cream cheese topping. Arrange any way you’d like! Sprinkle with parmesan cheese, chopped scallion, and shredded carrots (if using). If desired, sprinkle lightly with freshly ground black pepper.
- Cut into squares immediately, or cover and refrigerate for up to 24 hours before cutting and serving. A pizza cutter isn’t ideal for this—just use a sharp knife.
- Cover and store leftovers in the refrigerator for up to 5 days.
Notes
- Make Ahead & Freezing Instructions: The dough can be prepared through step 4, then, after it has risen, cover and place in the refrigerator for up to 2 days. Continue with step 5. To freeze the dough, prepare it through step 4. After it has risen, punch it down to release any air. Wrap in plastic wrap and place in a freezer-friendly container for up to 3 months. When ready to use, thaw the dough overnight in the refrigerator. Then let the dough sit at room temperature for about 1 hour before rolling out/shaping. If the thawed dough keeps shrinking back as you try to shape it, lightly cover it with plastic wrap or a clean kitchen towel and let it rest on the counter or your work surface for 15 minutes, to give the gluten a little more time to settle.
- Special Tools (affiliate links): Stand Mixer or Large Glass Mixing Bowl and Silicone Spatula / Wooden Spoon | Baking Sheet | Silicone Baking Mat or Parchment Paper | Handheld Mixer
- Yeast: You can use instant or active-dry yeast with zero changes. If you’re new to working with yeast, I recommend reviewing my Baking with Yeast guide. Note that 1 teaspoon is less than 1 standard packet.
- Vegetables: Use your favorite fresh vegetables, and keep the amount to about 3–4 cups (about 400g). Chopped broccoli, colorful bell peppers, cucumbers, and cherry tomatoes are crowd favorites. You can also use cauliflower, sliced olives, and/or radishes.
- Parmesan Cheese: I love using parmesan on this homemade cold veggie pizza, but you could substitute crumbled feta or shredded cheddar cheese.
Nutrition
- Serving Size: 1 slice
- Calories: 140
- Sugar: 1.5 g
- Sodium: 224.4 mg
- Fat: 8.7 g
- Carbohydrates: 12.1 g
- Protein: 3.6 g
- Cholesterol: 24.4 mg